Showing posts with label Photography. Show all posts
Showing posts with label Photography. Show all posts
Friday, August 22, 2014
Batch Processing of Images in GIMP
To perform batch processing of images in GIMP, you can get a plug-in called David's Batch Processor at the link - http://members.ozemail.com.au/~hodsond/dbp.html.
Extract the dbp.exe file and put it at C:\Program Files\GIMP 2\lib\gimp\2.0\plug-ins. Then, open GIMP and click Filters menu -> Batch Process... command. A pop-up windows - David's Batch Processor will appear as shown in the following figure and you can do the batch processing that you want.


Saturday, August 16, 2014
Selective Color Modification
I wanted to change the blue color of the road in the following picture to a green color. I wrote a MatLab program and run it in Octave.
Although I can simply use rgb color model to swap blue and green, I feel like it is too specific. That is why, I used hsv color model to change a hue of a color in a more flexible manner.


Sunday, December 7, 2008
Testing SB-900
At last weekend, I bought Nikon Autofocus Speedlight SB900 flash gun. But I was busy and I havn't tested it yet. In fact, I haven't finished the manual and I don't even know how to use it. Anyway, I have just made some trial shots. Have a look!
The first one was taken using no flash light. She was using computer and having an apple under fluorescent lighting and some light from computer monitor. Even with ISO400, it took fairly slow shutter speed (with my kit) and the photo is blur.
 The second one was using built in flash light.
 The third photo was taken using reflected light of SB-900 from ceiling.


Thursday, April 10, 2008
Reverse Macro Ring
Macro lens for close up photos are expensive for me. There are some cheap converter lens, but I don't like to use them after trying a few shots. Later, I found a link about home-made reverse ring here. The followings are about my home made reverse ring. I didn't have an old filter. Therefore, I bought the cheapest body cover ( 5 SGD) and filter (10 SGD).
 Then, I made a hole in the Body Cap. Filter was a new one and it was OK to leave as it was. But I thought it was better to remove the glass and I broke it using a hammer. To prevent the scattering of glass debris, you should pack it with a paper or a plastic or stick it with a piece of tape before you break it.

After putting them together, it became as shown. Take care, to put the thread outside. They must be glued at the sides that has no thread.

 Lens can be fastened in reverse now. The smaller the mm, the bigger the magnification. You can push the aperture lever to get a bigger aperture. I think 50 mm prime lens may be the best to use with reverse ring.

Here are a few shots I tried with this reverse ring.


 Then, I made a hole in the Body Cap. Filter was a new one and it was OK to leave as it was. But I thought it was better to remove the glass and I broke it using a hammer. To prevent the scattering of glass debris, you should pack it with a paper or a plastic or stick it with a piece of tape before you break it.
After putting them together, it became as shown. Take care, to put the thread outside. They must be glued at the sides that has no thread.

 Lens can be fastened in reverse now. The smaller the mm, the bigger the magnification. You can push the aperture lever to get a bigger aperture. I think 50 mm prime lens may be the best to use with reverse ring.
Here are a few shots I tried with this reverse ring.


Sunday, April 6, 2008
HDR in GIMP
In an HDR (High Dynamic Range) photo, some parts of the photo are too bright and some parts are too dark so that all of them cannot be captured by a camera in a single exposure or cannot be displayed on a screen.
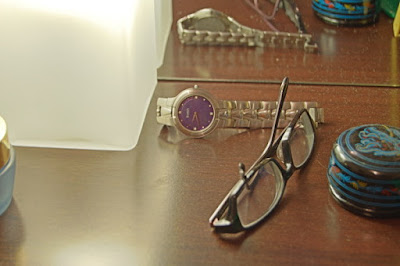
In the following picture, the side of the lamp is too bright and the side of the lacquered box is too dark.
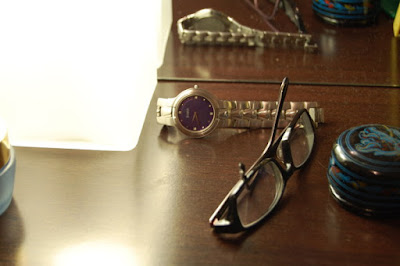 If you increase the exposure, the lacquered box side will be OK. But the lamp side will be too bright.
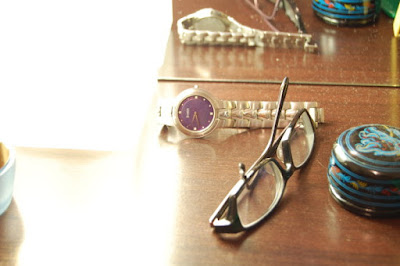 If you decrease the exposure, the lamp side will be just nice and the lacquered box side will be too dark to see properly.

We will use exposure bracketing to solve this problem. Take three exposures, one with normal exposure, another with +2 EV overexposed and the last one with -2EV underexposed. It is better to use a tripod and manual focus mode. Use fixed aperture to get same Depth of Field. After that, you need to put Exposure Blending Plug-in for GIMP.
You can download the plug-in from http://turtle.as.arizona.edu/jdsmith/exposure-blend-tinyscheme.scm. For GIMP 2.4.5, you need to put the file into C:\Program Files\GIMP-2.0\share\gimp\2.0\scripts. It can be vary according to your installed location. Then, open GIMP and click Xtns menu -> Photo -> Exposure Blend ... .
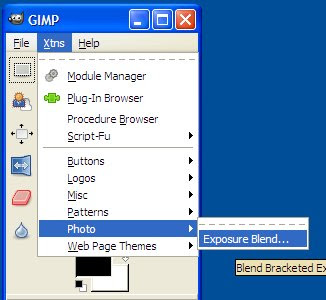 Insert the three pictures there.
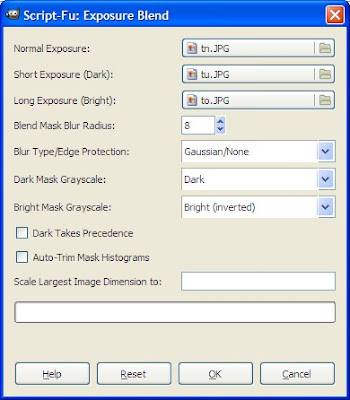 You can use your preferred settings.Click OK. After that you will get an Exposure Blended picture.
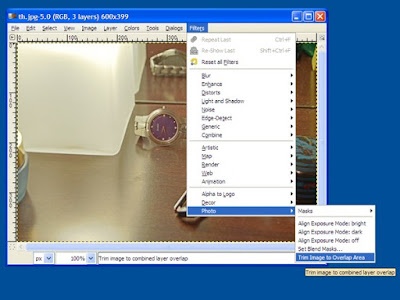
 If your pictures are not exactly the same, there is an auto align feature in some software such as Photoshop, PhotoMatix, etc. However, you need to align manually in GIMP. Go to Filters menu -> Photo -> Align Exposure Mode and you can adjust the layers using difference mode.
 You can also go to layer windows and adjust opacity, layer mask and many others fine tunings of dark layer and bright layer.

Reference:
http://turtle.as.arizona.edu/jdsmith/exposure_blend.php
 If you increase the exposure, the lacquered box side will be OK. But the lamp side will be too bright.
 If you decrease the exposure, the lamp side will be just nice and the lacquered box side will be too dark to see properly.
We will use exposure bracketing to solve this problem. Take three exposures, one with normal exposure, another with +2 EV overexposed and the last one with -2EV underexposed. It is better to use a tripod and manual focus mode. Use fixed aperture to get same Depth of Field. After that, you need to put Exposure Blending Plug-in for GIMP.
You can download the plug-in from http://turtle.as.arizona.edu/jdsmith/exposure-blend-tinyscheme.scm. For GIMP 2.4.5, you need to put the file into C:\Program Files\GIMP-2.0\share\gimp\2.0\scripts. It can be vary according to your installed location. Then, open GIMP and click Xtns menu -> Photo -> Exposure Blend ... .
 Insert the three pictures there.
  You can use your preferred settings.Click OK. After that you will get an Exposure Blended picture.
 If your pictures are not exactly the same, there is an auto align feature in some software such as Photoshop, PhotoMatix, etc. However, you need to align manually in GIMP. Go to Filters menu -> Photo -> Align Exposure Mode and you can adjust the layers using difference mode.
 You can also go to layer windows and adjust opacity, layer mask and many others fine tunings of dark layer and bright layer.
Reference:
http://turtle.as.arizona.edu/jdsmith/exposure_blend.php
Tuesday, March 25, 2008
Velvia
Just a try to get vivid colors something like Fujifilm's Velvia film using free software GIMP. Although you can use Hue-Saturation tool to increase color saturation, the following method is closer to Velvia. Another reason is that Saturation can sometimes posterize color.
Open the picture you want to edit. Open Colors menu -> Compoments -> Channel mixer....
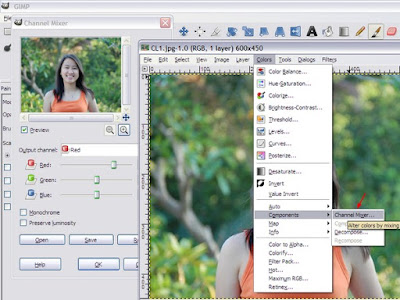 Choose Red in Output Channel and increase Red slider to 150. Reduce Green and Blue sliders to -25 to balance it. Repeat the similar steps for Green and Blue channels.
Click OK. Then choose Colors menu->Levels and increase the slider below input levels until you get a desire contrast.
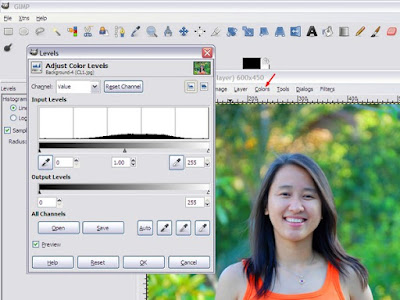 After that, you will get a Velvia style photo. See the following pictures as a comparison between original and Velvia style.
Before
 After
After

Reference:
http://photoshoptutorials.ws/photoshop-tutorials/photo-effects/velvia.html
 Choose Red in Output Channel and increase Red slider to 150. Reduce Green and Blue sliders to -25 to balance it. Repeat the similar steps for Green and Blue channels.
Output Channel: Red
Red: +150
Green: -25
Blue: -25

Output Channel: Green
Red: -25
Green: +150
Blue: -25

Output Channel: Blue
Red: -25
Green: -25
Blue: +150
Click OK. Then choose Colors menu->Levels and increase the slider below input levels until you get a desire contrast.
 After that, you will get a Velvia style photo. See the following pictures as a comparison between original and Velvia style.
Before
 After
After
Reference:
http://photoshoptutorials.ws/photoshop-tutorials/photo-effects/velvia.html
Lomography
Getting a photo using GIMP that is similar to the one taken with Lomo Lens is discussed. You can read about Lomography here. Lomo photos have distinct vignette -darken edges- caused by the lens. First, we will try to mimic it in our picture. Choose circle selection tool from GIMP tool box. Select the whole picture. Click Select Menu-> Invert.

Choose Layer Menu-> New layer (or) press Ctrl+Shift+N. Then give a layer name something like Vignette. Choose Transparency and click OK.

As shown in the following picture, choose black for Foreground color and white for Background color. Select "Vignette" layer and go to Dialog menu->layer-> layer dialog. Then fill black color using Edit menu-> Fill with FG color. Remove selection by clicking select menu->None.

Open Filter menu->Blur->Gaussian Blur. Set the blur radius to about one quarter of the width of photo. In this case, set it to 150 and click OK.

Go to Layer dialog and set the Opacity of Vignette layer to about 75%. In fact, the value can be set according to your preferences.

Select the Background layer. Open Dialog menu->Channels->Channels dialog. Select Red channel.

Open Color menu->Brightness-Contrast and increase Contrast about 50.

Similarly, increase contrast to 50 for Green channel. After that, you will get a lomo style photo. See the following photos for a comparison between original and lomo style photos.
Before
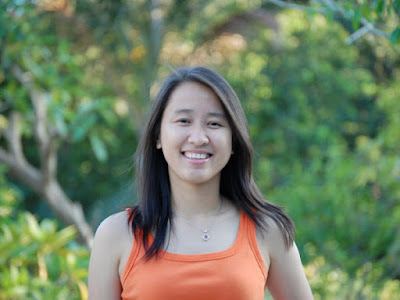
After
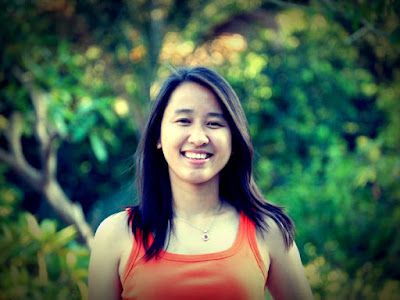
Reference:
http://photoshoptutorials.ws/photoshop-tutorials/photo-effects/lomography.html

Choose Layer Menu-> New layer (or) press Ctrl+Shift+N. Then give a layer name something like Vignette. Choose Transparency and click OK.

As shown in the following picture, choose black for Foreground color and white for Background color. Select "Vignette" layer and go to Dialog menu->layer-> layer dialog. Then fill black color using Edit menu-> Fill with FG color. Remove selection by clicking select menu->None.

Open Filter menu->Blur->Gaussian Blur. Set the blur radius to about one quarter of the width of photo. In this case, set it to 150 and click OK.

Go to Layer dialog and set the Opacity of Vignette layer to about 75%. In fact, the value can be set according to your preferences.

Select the Background layer. Open Dialog menu->Channels->Channels dialog. Select Red channel.

Open Color menu->Brightness-Contrast and increase Contrast about 50.

Similarly, increase contrast to 50 for Green channel. After that, you will get a lomo style photo. See the following photos for a comparison between original and lomo style photos.
Before

After

Reference:
http://photoshoptutorials.ws/photoshop-tutorials/photo-effects/lomography.html
Subscribe to:
Posts (Atom)