CLR Class Library
After starting Visual Studio 2012, choose New Project... → Installed → Templates → Visual C++ → CLR → Class Library. Then fill in the project name, location, and solution name as you want. Thereafter, click OK.
Write the header and C++ as shown below and build the solution.

// CppCLRDLL4VB.h

#pragma once

using namespace System;

namespace CppCLRDLL4VB {

 public ref class Clrdlltest
 {
 public:
  double Add(double a,double b);
 };
}
// This is the main DLL file.
// CppCLRDLL4VB.cpp

#include "stdafx.h"

#include "CppCLRDLL4VB.h"

namespace CppCLRDLL4VB {
 double Clrdlltest::Add(double a,double b)
 {
  return a+b;
 }
}
You will get the DLL in the output folder to be used in Visual Basic. So, create a new Visual Basic project.

In the solution explorer, right click on the project and click Add Reference.... Browse for the DLL and click OK to add it.

The following code use a label to display the output of the DLL function.
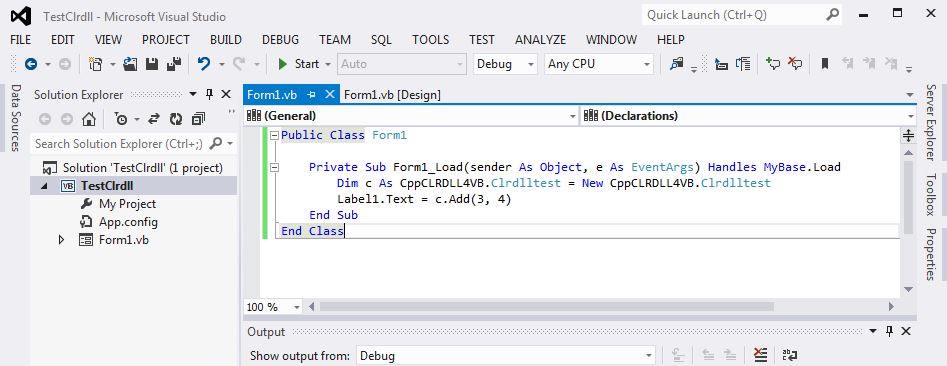
Dim c As CppCLRDLL4VB.Clrdlltest = New CppCLRDLL4VB.Clrdlltest
Label1.Text = c.Add(3, 4)
Notes:
CLR classes need to be preceded by "Public ref". And if a class has an array member, instead of declaringint a[20];, you need to declare as follows [3].
public ref class MyClass
 {
public:
  MyClass() {a=new int[20];}
  !MyClass() {if(a) delete [] a;}
 private:
  int* a;
 };
An easy way to use objects as function's arguments or return values is to put ^ as shown below.
MyClass^ MyClass2::GetClass(MyClass^ a)
{
 a->MemberFunc();
 return a;
}

String^ MyClass::ConvertStr(String^ s)
{
 String^ t="";
 string std="";
 for(int i=0;i < s->Length;i++){
  std+=(char)s[i];
 }

 for(unsigned int i=0;i < std.length();i++){
  t+=Convert::ToChar(std[i]).ToString();
 }
 t+=" :)";
 return t;
}
Win32 DLL
To create a Win32 DLL, click File on the menu bar → New Project.... Choose New Project... → Installed → Templates → Visual C++ → Win32 → Win32 Console Application. Then fill in the project name, location, and solution name as you want. Thereafter, click OK.
On the Overview page of the Win32 Application Wizard dialog box, click the Next button. On the Application Settings page, select DLL under Application type, and click the Finish button. Thereafter, create a header file by choosing, PROJECT menu → Add New Item.... In the dialog box, Visual C++ → Code → Header File (.h). Specify a name (CppWin32DLL4VB.h in this case) , and click Add button.
Write the header and C++ as shown below.
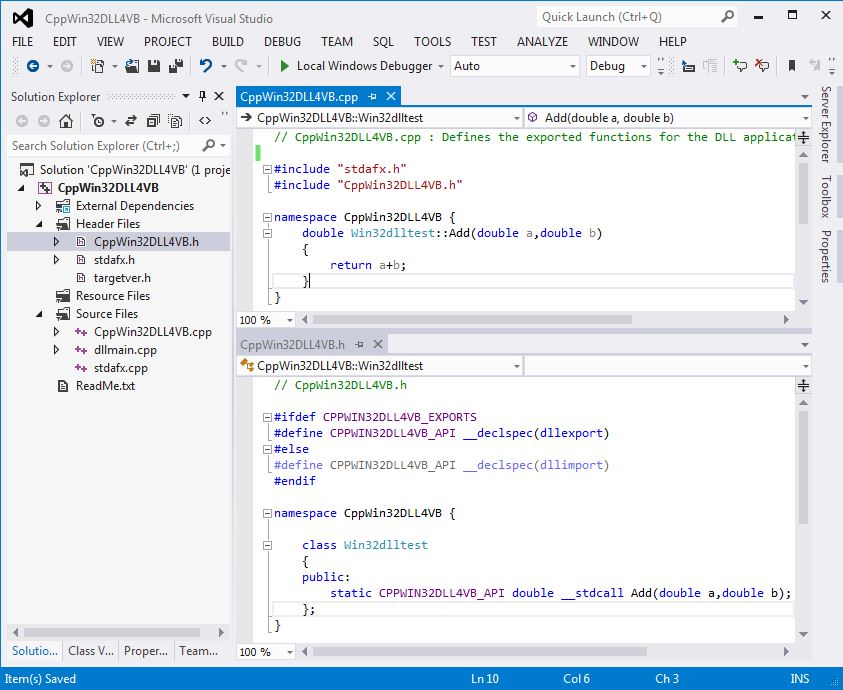
// CppWin32DLL4VB.h

#ifdef CPPWIN32DLL4VB_EXPORTS
#define CPPWIN32DLL4VB_API __declspec(dllexport)
#else
#define CPPWIN32DLL4VB_API __declspec(dllimport)
#endif

namespace CppWin32DLL4VB {

 class Win32dlltest
 {
 public:
  static CPPWIN32DLL4VB_API double __stdcall Add(double a,double b);
 };
}
// CppWin32DLL4VB.cpp : Defines the exported functions for the DLL application.

#include "stdafx.h"
#include "CppWin32DLL4VB.h"

namespace CppWin32DLL4VB {
 double Win32dlltest::Add(double a,double b)
 {
  return a+b;
 }
}
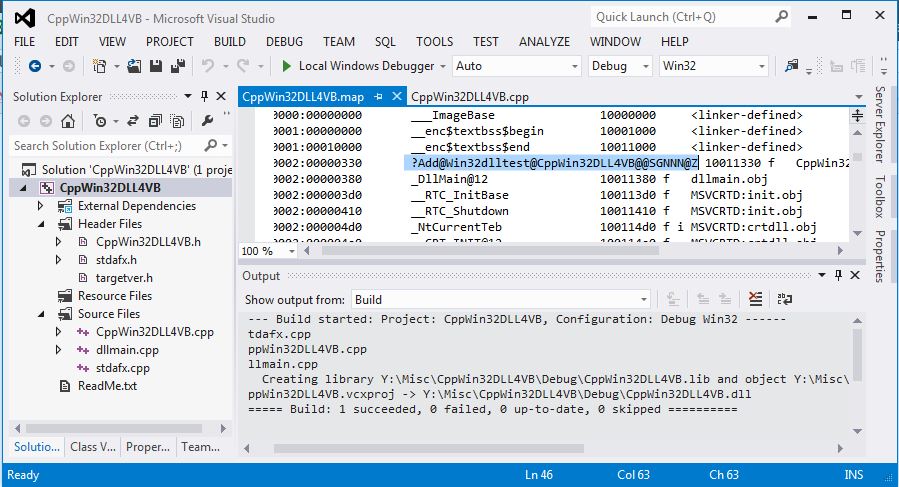
Open the project's Property Pages dialog box by right clicking on the project and choosing Properties. Modify Configuration Properties → Linker → Debugging → Generate Map File to Yes. Specify Map File Name like CppWin32DLL4VB.map and click OK. And then, build the solution. The specified map file will be produced in the sub folder where cpp and h files exist. Open it and look for the decorated name of Add function. It is found to be '?Add@Win32dlltest@CppWin32DLL4VB@@SGNNN@Z' in this case.
In the same folder as map file, create a new file with .def extension like CppWin32DLL4VD.def. And put the following code inside.
EXPORTS
   Add=?Add@Win32dlltest@CppWin32DLL4VB@@SGNNN@Z
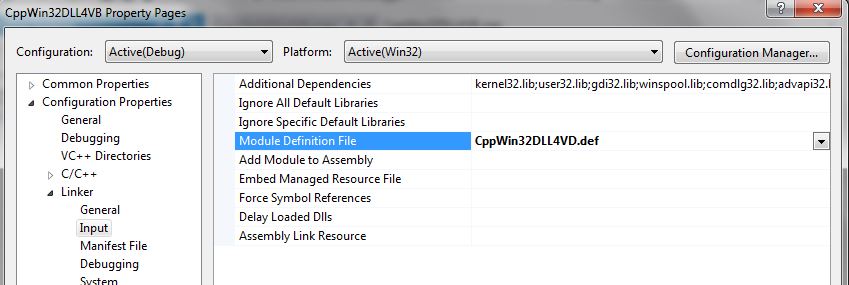
Then, open the project's Property Pages dialog box again, specify Configuration Properties → Linker → Input → Module Definition File to the .def file that you created.
And build the solution again. The DLL and lib files will be in the output folder where there is .sln file (not the output folder where there is map file).
To test the DLL, we will create a new Visual C++ console project by choosing New Project... → Installed → Templates → Visual C++ → Win32 → Win32 Console Application. Then fill in the project name, location, and solution name as you want. Thereafter, click OK.

On the Application Settings page, select console application under Application type, and click the Finish button. In the solution explorer, right click on the project and open its 'Property Pages' dialog. Specify the folder for the header file -CppWin32DLL4VB.h - at Configuration Properties → C/C++ → General → Additional Include Directories.

Again, specify the folder for the library file -CppWin32DLL4VB.lib - at Configuration Properties → Linker → General → Additional Include Directories.

To specify the library in which the linker should look into, go to the Linker → Input → Additional Dependencies entry add the name -CppWin32DLL4VB.lib. And then copy and paste the DLL file CppWin32DLL4VB.dll in the output folder. Modify C++ source file -Win32DLLVC.cpp- like the one shown below.
// Win32DLLVC.cpp : Defines the entry point for the console application.
//

#include "stdafx.h"
#include < iostream >
#include "CppWin32DLL4VB.h"
using namespace std;
using namespace CppWin32DLL4VB;
int _tmain(int argc, _TCHAR* argv[])
{
 double c;
 c=Win32dlltest::Add(5,4);
 cout << c << endl;
 return 0;
}
As in the previous section, create a Visual Basic program to test the DLL, copy the DLL file into the output folder, and add a label to show the output.

Double click the form and the VB code in 'Form1.vb' can be modified as one of the follows.
Public Class Form1
    Public Declare Function Add Lib "CppWin32DLL4VB.dll" Alias "Add" (ByVal a As Double, ByVal b As Double) As Double
    Private Sub Form1_Load(sender As Object, e As EventArgs) Handles MyBase.Load
        Label1.Text = Add(5, 4)
    End Sub
End Class
Imports System.Runtime.InteropServices
Public Class Form1
    < DllImportAttribute("CppWin32DLL4VB.dll", EntryPoint:="Add",
    SetLastError:=True, CharSet:=CharSet.Unicode,
    ExactSpelling:=True,
    CallingConvention:=CallingConvention.StdCall) >
    Public Shared Function Add(ByVal a As Double, ByVal b As Double) As Double
        ' Leave this function empty. The DLLImport attribute forces calls to be forwarded.
    End Function
    Private Sub Form1_Load(sender As Object, e As EventArgs) Handles MyBase.Load
        Label1.Text = Add(5, 4)
    End Sub
End Class
References:
[1] https://msdn.microsoft.com/en-us/library/ms235636(v=vs.110).aspx
[2] https://msdn.microsoft.com/en-us/library/dt232c9t(v=vs.110).aspx
[3] https://blog.mythicsoft.com/2008/03/05/36/
No comments:
Post a Comment
Comments are moderated and don't be surprised if your comment does not appear promptly.